
Adapter for steering wheel control mercedes a, b, c, sprinter, vito, viano, vw crafter. ctsmc017.2
Adapter for steering wheel control mercedes a, b, c, sprinter, vito, viano, vw crafter. ctsmc017.2
Guarantee
12 month
Delivery from Europe in
4 - 14
business days
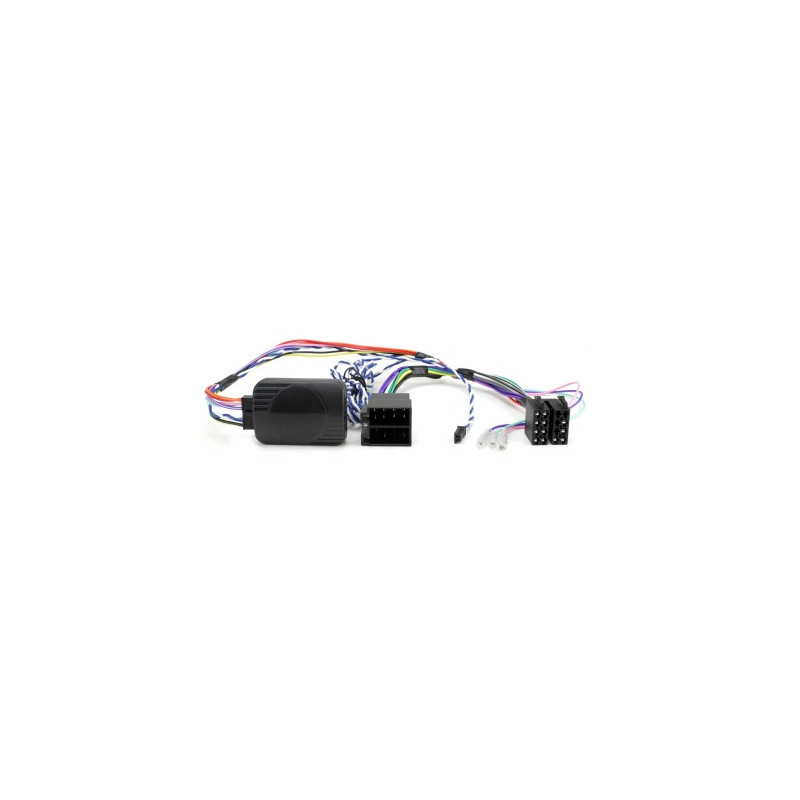
Steering wheel control adapter for Mercedes A, B, C, Sprinter, Vito, Viano. CTSMC017.2 Steering wheel control adapters are becoming increasingly popular car accessories, eagerly used not only by young drivers but also by more experienced ones. They ensure easy radio operation and convenient operations such as increasing or decreasing music volume, changing tracks, or muting the sound. Our steering wheel control adapter model, Steering wheel control adapter for Mercedes A, B, C, Sprinter, Vito, Viano. CTSMC017.2, allows you to install an aftermarket OEM radio while maintaining the vehicle's original functions, such as date and time. Why buy a steering wheel control adapter? Remember that a steering wheel control adapter for your car radio is not only convenient, but also safe. With this device installed in your vehicle, you don't have to take your hands off the steering wheel to operate the radio. This way, you stay focused on the road and have much more control over your vehicle. Retain your steering wheel controls when replacing your factory head unit with an aftermarket head unit. Please compare the shown harness connectors with the connectors in your vehicle and make sure they match optically and technically. Notes: CAN Bus, CAN Bus 2-pin connector - internal CAN bus distributor Vehicles without OEM HU coding > vehicle code to Audio 20 OEM HU xa0 CAN Bus connection: xa0 interior footwell CAN bus distributor in vehicle CAN Bus blue/CAN High <> white/CAN Low alternative > climatronic twisted red/brown CAN High <> brown CAN LOW xa0 Turn signal not always supported: Reverse gear signal on driver's side +12V cable white/blue alternative xa0 Vehicles with OEM HU and ISO connector: SWC Mercedes/Smart/VW various ISO vehicles > item: 01952 Make and model: Mercedes A-Class (C169/W169) 10.2004 - 04.2008 Mercedes A-Class (C169/W169) 06.2008 - 06.2012 Mercedes B class (T245) 07.2005 - 04.2008 Mercedes B class (T245) 04.2008 - 09.2011 Mercedes C-class (CL203/S203/W203) 02.2004 - 09.2007 Mercedes Sprinter (W906) 04.2006 - 08.2013 Mercedes Sprinter (W906) 08.2013 - 05.2018 Mercedes Vito/Viano (W639) 04.2006 - 08.2010 Mercedes Vito/Viano (W639) 09.2010 - 03.2014 xa0 VW Crafter I (2EC/2EK/2F) 03.2006 - 07.2011 VW Crafter I (2EC/2EK/2F) 07.2011 - 11.2016 The following signals are available: Re-imported vehicles or vehicles with different software may not be compatible in terms of function. Red: Ignition terminal +12V 15 Orange: Lighting terminal +12V 58 Purple/White: Feedback signal +12V Green: Parking brake signal GND Load capacity of total outputs: 100 mA max. Current demand greater than 100 mA: 1 relay coil resistance 75 Ohm min. 2 relays coil resistance 150 Ohm min. SWC *in case of incorrect operation of the interface, if possible, code the vehicle to Audio 15 OEM HU General installation instructions: Verification: 1: Check all operational functions and settings functions of the vehicle OEM HU. 2: Disconnect voltage-free HU OEM.3: Check the correctness of all interface connections in voltage-free mode.Connection and connection sequence:1: Check the settings and hardware configuration of the voltage-free interface.2: Check the configuration of the voltage-free radio connection cable.3: Connect the radio connection cable according to the HU retrofit operating instructions.4: Connect all other connections according to the HU retrofit operating instructions.5: Connect the entire installation to the vehicle with the main connection last.6: Configure the interface software according to the instructions in the section text and in the instructions.7: Configure the retrofit device according to the operating instructions for the steering wheel remote control/camera/FSE/phantom power supply for the antenna and others.8: Test the operation of the steering wheel remote control and the vehicle.Changes to the configuration of the interface and the cable for connecting the radio:1: Change the configuration without voltage.2: Reconnect, see above 5 to 8.In case of incorrect operation of the interface or vehicle:1: Reinstall the OEM HU.2: Operate the OEM HU.3: Determine the closure of the CAN bus.4: Check the hardware configuration of the interface.5: Reconnection after CAN bus has been disabled, see above 5 and 6. More connections, connection changes, alternative connections, connections of loose cables or extensions of connections of loose cables given in the information text or instructions are for guidance purposes only and the information of a trained installer. More connections, changes to the wiring configuration in the wiring harness or the use of alternative connections or extensions of connections:1: Connections and changes may only be carried out by trained installers.2: Connections and modifications must be checked for any manufacturer approvals or warranty conditions before connection.